We love teaching our Human Body Unit from the inside out. Skin, muscles, bones, and all the other systems that work in-between. Before we begin though, we like to introduce important vocabulary using prefixes/suffixes/root words used in the medical community – it’s a great way to get your kids involved in self-care and in understanding their visits to the doctor, as well to help cement those often difficult terms when learning about the human body.
Sponge or Bellwork: Our lessons always start with a bell-work question or activity that gets kids thinking about the topic at hand. For example:
- Have students think about the functions of the integumentary system.
- Our Human Body Word Dissections Lesson lesson gets kids familiar with some of the terminology that is used throughout the Human Body unit and it’s a great way to get them thinking about the English language and how the words are comprised of Greek and Latin terms.
Since we work from the inside out, we start with the Integumentary System – hair skin and nails. Here’s how our lesson would go:
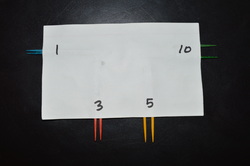
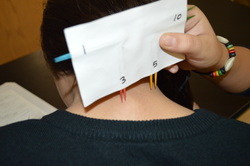
1. Pair students up to test the sensitivity of each other’s skin. Have them begin by predicting which area of the body they believe will be most sensitive and which area will be least sensitive of the places tested. We tested the back of the neck (you know how pre-teens and teenagers are about the back of their necks!), back of hand, and fingertip. Before you begin, go over the procedures and discuss how to use the caliper. Everyone KNOWS there are two toothpicks at different distances on the card but the question is, how does it FEEL?
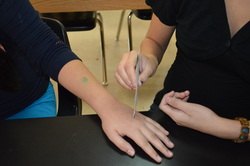
2. Students take turns, one acting as the poker, the other acting as the pin cushion. Tell the students that are being tested to close their eyes and tell honestly if they feel two toothpicks (which means they are highly sensitive) or one toothpick (which means they lack sensitivity) as their partner gently touches them in one of the locations. The back of the hand…
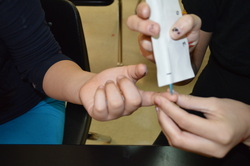
The fingertip… use the pointer finger of their dominant hand to decrease variables and make sure your data is accurate for all students.
Explain It: Students should be recording their lab data in their data table – make this even more efficient by having students record a “+” (two toothpicks felt = sensitive) and “-” (one toothpick felt = not sensitive). When finished, have them work in a group or think-pairs-share on their conclusion questions.
Did They Get It?: In this lab, the ultimate goal is to get kids thinking about the distribution of nerve receptors in the skin areas that we tested. Students should come to the conclusion that the fingertips are the most sensitive because touch receptors are plentiful and arranged close together – you don’t walk into a dark room and start feeling around with your neck or the back of your hand! The other body parts are less sensitive because touch receptors are arranged far apart from one another.
Here’s a few extensions for this lesson:
- Have students research skin grafting and how the process works.
- Have students research skin pigmentation and how various pigments protect the skin.
- Have students continue the sensitivity lab at home, testing other areas of the body.
Need to modify?
- Reduce/increase the number of areas to be tested or the incremental measurements on the caliper.
- Create printed data tables for your students that have executive function deficits.
Happy teaching!
Inspire Students. Love Teaching.
We have everything you need to successfully teach life science and biology. Join over 85,000 teachers that are seeing results with our lessons. Subscribe to our newsletter to get a coupon for $5 off your first order!