Whether you’re a seasoned veteran or a newbie to science lab stations, let us fill you in on why they should be a staple lesson for your curriculum – and why making them CROSS-CURRICULAR by using STEAM science lab stations will help your kids to transcend the basic concepts and really relate them to their every day lives.
WHAT ARE SCIENCE LAB STATIONS?
Science lab stations are student-led activity areas or “stations” that allow for students to move at their own pace during class all while learning about a scientific topic or concept. Depending on the amount of time allowed at each and the overall set-up of your stations, students can rotate between various activities, with each providing a differentiated lesson that is geared towards your students learning modalities.
In our classes, our stations had an assortment of activities – from microscope observations and mini-labs to computer and video stations. We also created labs with the appropriate amount of rigor (while still being differentiated for our varied learners), and here’s the kicker… we also made our stations cross-curricular to incorporate STEAM! Want to learn how to make your own? Keep reading to find all the information you need to create your own stations and implement them in your classroom!
WHY ARE OUR STEAM SCIENCE LAB STATIONS SO UNIQUE?
Our STEAM science lab stations are unique because they are created with a cross-curricular, interdisciplinary approach, all while keeping the main concepts of science as the backbone of each lesson. We’ve found that these types of lessons helped to solidify student understanding of difficult science topics and increased retention of the material because they could relate the information to real-world examples in a variety of ways. What’s different with our version of STEAM is that we take a unique stance on the acronym by incorporating different biology and life science topics using:
Social Studies (history, current events, and geography)
Technology (computers and engineering)
ELA (reading, comprehension, vocabulary, and writing)
Arts (music, art, PE/dance, drama and debate)
Math (computation, word problems, analyzing and creating graphs/tables)
We truly believe this method of teaching life science through STEAM stations shows how these concepts flow across the various subject areas and demonstrates to students how it is relatable in all aspects of life.
 GIVE THE STUDENTS “STATION ROLES”:
Rather than focusing on the various tasks students will be completing as they rotate between stations, why not instead make students aware of WHO they are supposed to BE or act like as they make rounds? Below is a list of stations we include, what is covered for each role students play, and the some examples of types of activities you can provide at each station:
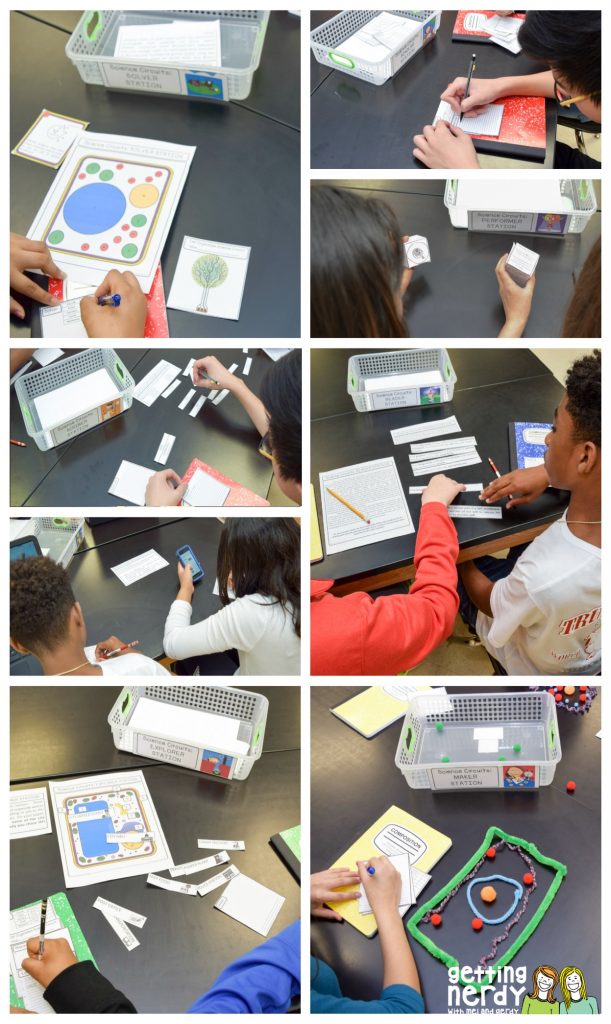
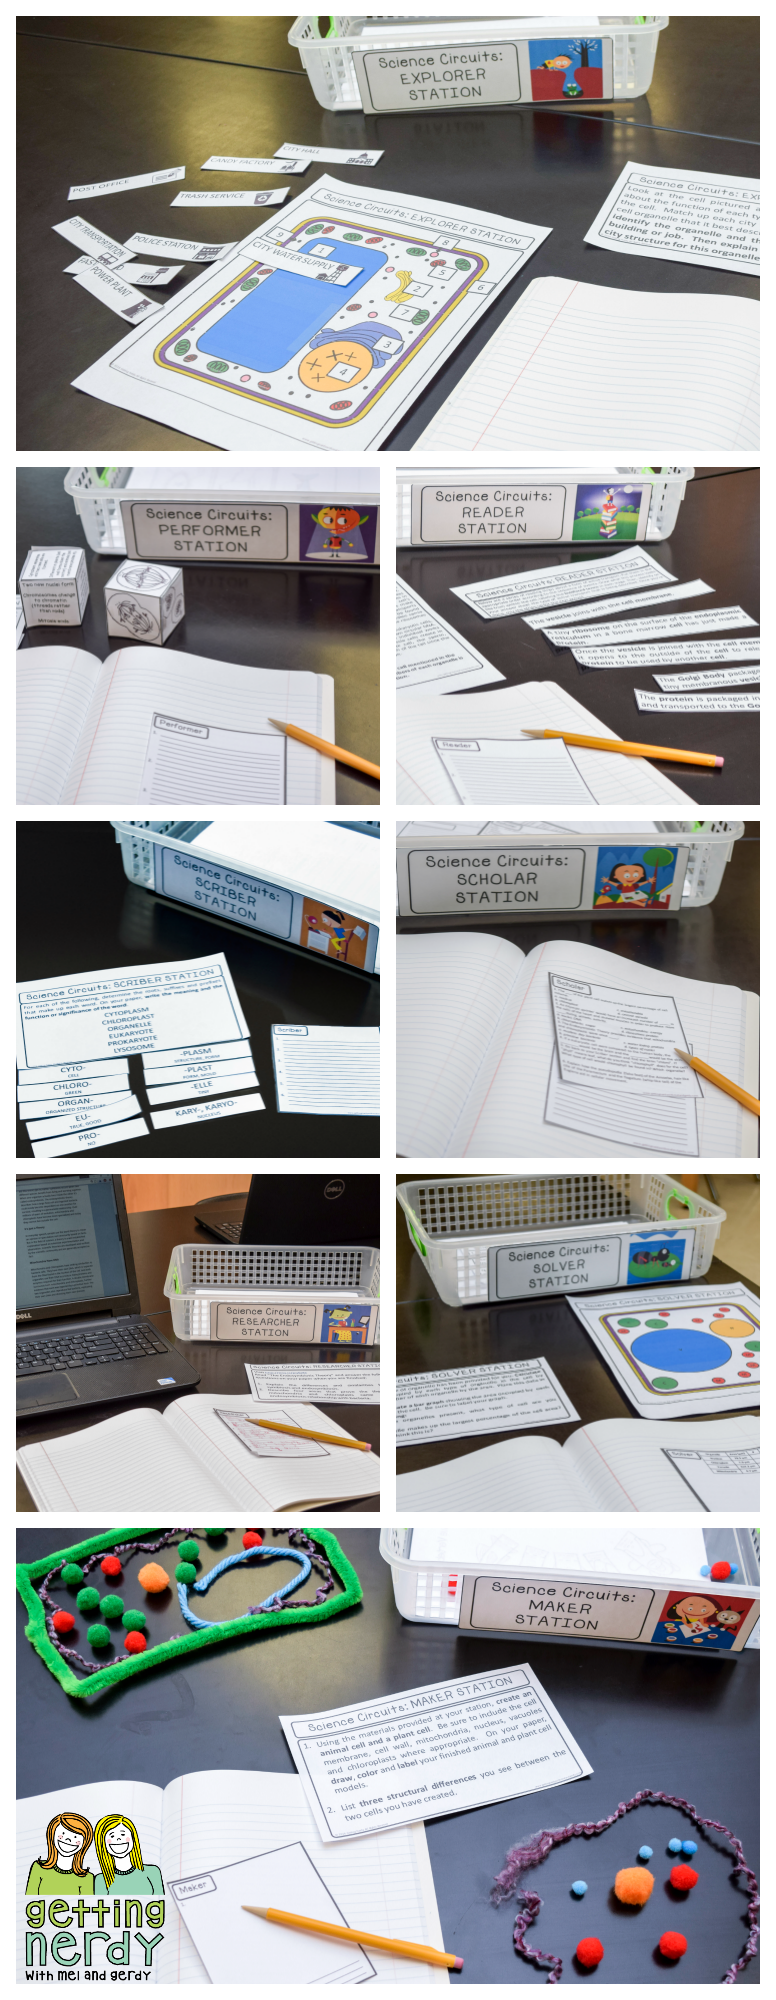
Explorer: As an explorer, students engage in Social Studies, Geography, and History as they learn about current and historical events, as well as important historical figures, inventors, explorers, political and environmental issues, etc.
Activities might include: mapping, recreating a moment in history, writing a political stance letter, or creating or sorting timeline events.
Maker: Students become engineers as they design, build, assemble, and/or experiment with hands-on manipulatives. These can be abstract creations or more literal depending on the desired outcome – just give your kids a basket of appropriate materials and see what they can make!
Activities might include: designing on paper, building models with simple household/classroom materials, carrying out a quick experiment, or solving puzzles
Researcher: Students use a computer, smart phone, tablet, or other electronic device to research a topic via a webpage, video, interactive site, or webquest and answer questions.
For these activities, we like to provide students with a website URL to visit using bitly or by creating a QR code that can be scanned using a phone or tablet. Once there, we ask specific questions about a video they watch or website reading. Looking for sites to use? We have compiled a very comprehensive list of FREE interactive sites for life science and biology HERE.
Scriber: At this station, students are writers and will respond to various tasks, questions, and prompts. These are quick write activities that should be easy to complete without creating multiple drafts.
Activities might include: writing tasks such as answering questions, responding to a prompt, solving a problem, creating a poem, or something as simple as defining terms or deriving meaning from root words, prefixes and suffixes. A favorite site to use for understanding how vocabulary words relate to one another is Visuwords.
Reader: As a reader, students read a passage or webpage while analyzing critically.
Activities might include: answering questions about the reading, identifying key terms and/or definitions, comparing and contrasting concepts or vocabulary words, or analyzing the reading for main points and concepts.
Performer: One of our favorites! Here, students are actors, dancers, athletes, gamers, artists, sculptors, musicians, and more!
For this station, students let their creative juices flow as they perform a dance or move (how about working together to physically model the cell membrane?), make creative drawings or sculptures, create a poem or rap, participate in a debate, play a game, analyze a song or movie clip, solve a puzzle, or reenact a moment. It’s their moment to be as creative as they want within the realm of science!
Solver: One of the most important sister subjects to science is math! Here, students are mathematicians as they answer questions about the world around them using numbers.
While we fancy ourselves as nerds, we do not incorporate grade level math standards at this station. You most certainly could though and it would be an incredible way to work with your team mates on a cross-curricular unit! However, what we like to do is develop math problems that directly relate to the topic they are studying. Using their mathematics skills, students answer word problems, solve equations, and analyze or create graphs and tables just like a scientist in the field. For example, when studying cells, they might analyze a picture and determine particle movement across a cell membrane during osmosis. For ecology, they might determine average rainfall in a rainforest land biome. The options are endless and while it might not be the most rigorous math, it is REAL math as it relates to science.
Breather: While you can squeeze this station into your rotation at a specific point, you can also let students visit this station whenever they need to. For example, if they did not have enough time to complete an activity, you can let them visit to get caught up. You could add this break station to help reduce group size.
Another option is to place a textbook or computer at this station and allow students to look up background information that might help them complete other activities from their other stations. Assign a few questions from the textbook so it’s not a station for goofing off. Teacher’s choice!
Scholar: This assessment piece can be used in a multitude of ways. Used a stand-alone station, students can attend it at the end of their rotation or at the end of the class period in order to assess their understanding of the day’s activities. Complete the assessment as a whole class, in small groups, or individually. Depending on the level of understanding, you can have them complete it with or without your assistance. You could also assign this station for homework and go over it the following day in class since the assessment questions are provided on the answer sheet.
We ask 5-6 questions here in various formats: multiple choice, fill-in-the-blank, short answer, venn diagram/compare and contrast, etc.
 ORGANIZING YOUR STATIONS:
We suggest using science lab stations at least once a week in your classroom so students can get accustomed to the format and can anticipate what they are working on each week. Below are several suggestions we have for completing lab stations. Feel free to use these ideas, or create your own method for implementation!
Station Placement: Place activities in different locations throughout your room. If you wish to limit student movement, make multiple copies of each station and place all stations at each group of students. We recommend placing 2-4 students per station depending on your classroom size. If classes are large, you could double up some stations or add a few of your own using the blank templates provided. Another option would be incorporating more than one breather station so students can catch up on their work if the task is proving to be too lengthy.
Stations Identification: Each station needs a sign (so they know where they are) and baskets or other container (buckets, folders and mailing envelopes could do the trick in a pinch here) to contain printable station materials. We ALWAYS recommend laminating anything the students don’t consume for multiple years of use. You can tape your station signs to your preferred container, hang them from the ceiling, or tape them down to the desks. Store the station answer sheets, necessary lab materials, and any extra items like colored pencils, sharpeners, etc. to complete the activity in your container. Voila! Visit our store by clicking HERE – we’ve posted FREE Lab Station Signs for you to use in your classroom as well as a description of student roles at each station.
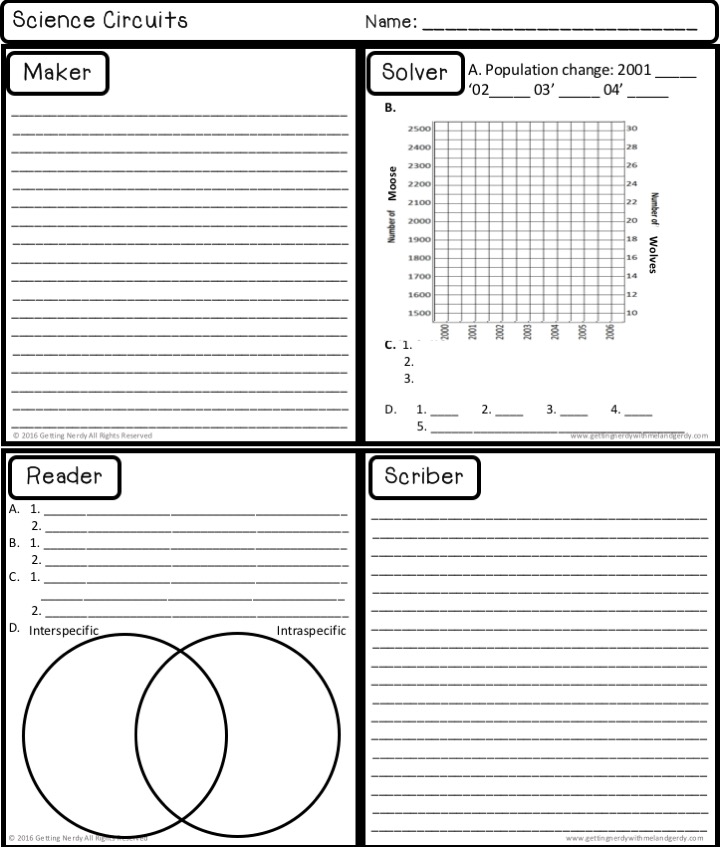
Answer Sheets: For student station answer sheets, save space by creating an INB compatible booklet. We like to print four answer sheets on every piece of paper. Have students cut out each answer sheet along the lines and staple the stations sheets together to make a booklet. Each station booklet will fit perfectly inside an interactive notebook or can be turned in to you for grading. Or, students can simply place their name at the top of the pages and turn them in to you without cutting them out and making booklets. If you’re short on supplies, you can always have students write their answers in their INB or notebook by dividing their paper into four quadrants with their pencil, making sure to write the title of each section according to the station they are working at in the top left corner of each quadrant, and placing their answers inside.
Station Timing: You can have students move through science lab stations in two ways – timed or untimed. Depending on how you like to run your stations, they can take anywhere from one to two class periods for each student to complete. That being said, we recommend you keep the level of rigor of your questions/activities and the amount of time to complete each one in mind as you design them. We generally think it is a good idea to design your stations such that they can be completed within 5-10 minutes each. If time is of the essence, you can easily remove stations of your choice or ask that students complete what they can within the time limit you provide them. To keep track of timing stations, use something like an Online Stopwatch that is visible to students no matter where they are in your room as it can be projected onto your white board.
Student Completion: Depending on your class dynamics, you can choose to place students randomly at lab stations or create student groupings prior to letting them loose. It doesn’t matter which station students start with, as long as they pay attention to where they write their answers (you don’t want maker answers under the researcher heading) and that the scholar station is last (if you decide to create a station for that assignment). You can provide students with their answer sheets before going to the stations, or to minimize your task of passing out papers, you can simply place the answer sheets in each basket and have students grab them as they rotate. Students can rotate through the different activities in any manner you wish – clockwise, counterclockwise, alphabetical, numerical (if you choose to add a number to each station), by their birthdate, height, eye color (we kid!), etc. Be sure that students visit every station, read the directions, and complete the activities until each answer sheet is filled out. When finished, they create their STEAM station booklet that will fit perfectly in their interactive notebook or can be compiled throughout the year as each topic is covered.
GRADING STUDENT WORK:
You can grade each station activity in its entirety or select just a few main questions to focus on…or, try this SHORT CUT – use the scholar station that assesses the main takeaways for each topic for an overall comprehension and accuracy grade, and then grade the station booklet for completion.
The scholar assessments can also come in handy for data analysis to identify those students who might need extra assistance during future lab stations or in class in general. Then, as we mentioned before, you can use future station days to provide that extra opportunity to meet one-on-one with students for tutoring, extra assistance, etc. – just add an additional station where you sit and invite students to visit you during their rounds.
In the event that a student is absent, we recommend creating your own classroom notebook that contains answers to each of the lab stations. While copying is not the best way to learn, we always felt it was better than having students miss the material altogether – at least they have it for review! If you don’t have time to keep up with a notebook, we suggest asking your early finishers to help create a lab stations answer sheet for your notebook.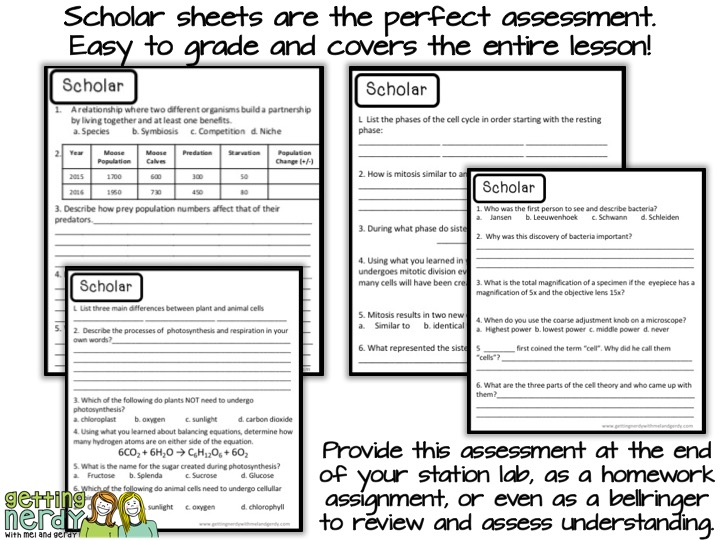
UTILIZING YOUR LAB STATIONS:
Remember that these activities are multifaceted and can be used in a variety of ways. If you don’t want to spend one to two days completing stations, pick and choose various activities from a unit and assign them in class. They are perfect enrichment opportunities for early finishers, tools for differentiating your lessons during the class period, can be assessment pieces at the end of the day, an exit ticket, mini-lab, homework assignment and so much more!
What’s even better is that because the students are in charge of their own work, you’ve time to lead small group instruction, have individual student conferences, offer tutoring, assist at a station, or do anything else of importance during the work period. Yes, please!
READY, SET, GO!
Think you’re ready to implement science lab stations in your class? We hope we were able to give you some useful ideas for creating and implementing lab stations, and more importantly, STEAM stations, in your life science classroom. We know your TIME is VALUABLE, so if you’re short on extra lesson-planning hours, why not let us help you out! We have individual, unit bundles, and our entire STEAM lab station bundle available for purchase in our store.
We even have a Cross-Curricular STEAM Lab Stations Set-Up Guide available for FREE! Signage and directions are available to you so you can test out STEAM stations with your students. Time to move full STEAM ahead on implementing STEAM science lab stations in your class now!
Inspire Students. Love Teaching.
We have everything you need to successfully teach life science and biology. Join over 85,000 teachers that are seeing results with our lessons. Subscribe to our newsletter to get a coupon for $5 off your first order!
Thanks for such detail. This is something I have been tossing around in my head, but was struggling with what to include in each station.
What age range are your students? From what I can see, you have middle school students. I am a high school teacher and have been thinking of having a science learning stations but am worried my students will not be as engaged. Is this activity for any grade level?
Hey Stephanie!
Thanks for reaching out. Our lessons are mostly geared toward middle school, but we have gotten tons of feedback from high school teachers who say their kids LOVE them. The stations are rigorous and engaging and can be adapted for many different uses. Hope this helps!
Always nerdy,
Mel and Gerdy
Thank you, yes I love the ideas on your blog. I have only been teaching a few years, but I do not want to get bored with what I do and love getting ideas from others that work in their classroom.
Where do you typically fit stations in to a unit timeline? Do you generally do this type of activity towards the end of the unit? Thanks for the info!